2010年3月23日 星期二

在C#中使用Unmanagement函式(DllImport)

要在Management程式(.net程式)中使用舊有的Unmanagement函式,例如User32裡面的API,需要使用DllImport來做轉換,最單純的用法就像在在WPF中取得螢幕的解析度中使用的GetSystemMetrics

[DllImport("user32.dll")]
static extern int GetSystemMetrics(int nIndex);

這裡僅需要知道這個函式寫在哪個dll,以及傳入傳出的參數形態就可以
簡單的形態轉換可以參考Managed and Un-Managed Code in .NET

在這邊有幾個可以注意的地方
第一個是可以做函式名稱的轉換(為了統一命名規則之類的原因)

[DllImport("user32.dll") EntryPoint="GetSystemMetrics")]
static extern int gsm(int nIndex);

依照這樣的寫法就可以用一個gsm的函式呼叫原本在User32中叫做GetSystemMetrics的函式

另一個是如果回傳是BOOLEAN的型別,則需要用MarshalAs來轉換,例如

BOOLEAN BoolFunction();

就需要寫成

[DllImport("a.dll")]
[return: MarshalAs(UnmanagedType.U1)]
static bool BoolFunction();


--
參考資料
請以 MarshalAs 標記布林 P/Invoke 引數
指定進入點
Managed and Un-Managed Code in .NET
UnmanagedType 列舉型別
2010年3月22日 星期一

在WPF中使用部分影像筆刷

在WPF中使用影像筆刷(ImageBrush)可以很容易的將文字或是圖形使用想要用的圖片填滿,可以參考在WPF中使用影像筆刷(ImageBrush)

不過有時候我們不想要用整張圖填滿,這時候就需要用ViewBox了
直接設定一個Rect去限定圖片中的某個範圍
然後再依照Stretch的屬性去填滿

private void SetViewBox(ImageBrush ib, Rect r)
{
ib.ViewboxUnits = BrushMappingMode.Absolute;
ib.Viewbox = r;
}

這裡採用的是絕對座標
也可以使用相對的方法(BrushMappingMode.RelativeToBoundingBox)
那傳入的Rect就要變成相對於整張圖的座標
例如(0,0,0.5,0.5)就是左上角的四分之一張圖

--
參考資料
TileBrush.Viewbox 屬性

在C#中計算角度

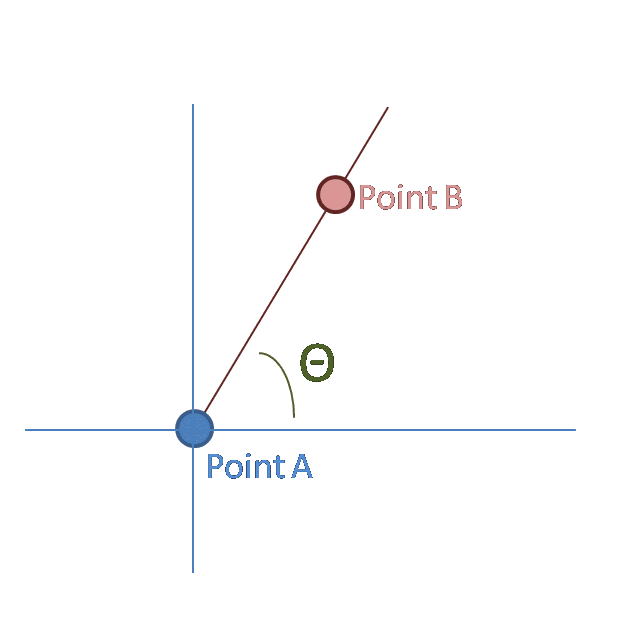
在一些圖形回饋的程式中(比如比較炫麗的圓形操控程式)
常會需要計算單點對應到另一個點的旋轉角度

一般的想法就是先算兩點的向量,然後除成tan
再用Math裡面的atan去反推回角度
需要考慮分母為零或是正負號的問題

但其實在Math另外有一個atan2的函式可以直接透過兩點的向量算出角度

private double CalAngle(Point pa, Point pb)
{
/// Y alias is reverse from Cartesian plane
return Math.Atan2(pa.Y - pb.Y, pb.X - pa.X);
}

記得在笛卡爾座標系跟螢幕上的座標的Y軸是反向的
所以計算要反過來減

--
參考資料
Math.Atan2 方法

2010年3月15日 星期一

在WPF中取得像素顏色(Pick Color)

在寫調色盤介面的時候,需要在一張圖透過滑鼠去選取顏色

一個很簡單的做法就是使用一個Image控制項,加上MouseDown事件
另外加一個色塊去表示取出的顏色

<StackPanel>
<!-- an image to pick color from -->
<Image Name="img" Source="color.png"
MouseDown="Image_MouseDown" />
<!-- an rectangle to output picked color -->
<Rectangle Name="rec" Height="20" />
</StackPanel>

然後將MouseDown的事件處理定義如下

private void Image_MouseDown(
object sender, MouseButtonEventArgs e)
{
/// get a bitmap reference
BitmapSource bmp = img.Source as BitmapSource;

/// get mouse down position
Point pos = e.GetPosition(img);

/// map position to pixel base
int x = (int)((pos.X / img.ActualWidth) *
bmp.PixelWidth);
int y = (int)((pos.Y / img.ActualHeight) *
bmp.PixelHeight);

/// pick the color to a byte array
CroppedBitmap cb = new CroppedBitmap(
bmp, new Int32Rect(x, y, 1, 1));
byte[] pix = new byte[4];
cb.CopyPixels(pix, 4, 0);

/// show the picked color
rec.Fill = new SolidColorBrush(
Color.FromRgb(pix[2], pix[1], pix[0]));
}

這樣在程式中點那張圖的時候
下方的長方形圖快就會被填滿為點下選取到的顏色

注意這邊我們對應到圖片的位置的時候
要轉換成PixelWidth & PixelHeight
因為圖片本身的dpi可能不同
直接使用圖片的大小可能會對應錯誤或超出範圍

--
參考資料
WPF : A Simple Color Picker With Preview
BitmapSource.CopyPixels 方法 (Array, Int32, Int32)