2010年12月28日 星期二

在C#中讀取Excel的試算表

取出試算表的名稱後,就可以針對單一試算表進行讀取

public List LoadExcelSheet(
string excelFile, string sheetName)
{
List dataList = new List();

/// load excel file as an ole database
OleDbConnection excelDatabase =
new OleDbConnection(string.Format(
"Provider = Microsoft.Jet.OLEDB.4.0;" +
"Data Source = {0};" +
"Extended Properties='Excel 8.0;HDR=No'",
excelFile));
excelDatabase.Open();

/// query sheet from excel file
OleDbDataAdapter sheetAdapter =
new OleDbDataAdapter(string.Format(
"SELECT * FROM [{0}]", sheetName),
excelDatabase);
DataTable fileData = new DataTable();
sheetAdapter.Fill(fileData);

/// scan all cells in the sheet
foreach (DataRow row in fileData.Rows)
{
foreach (object item in row.ItemArray)
{
if (!(item is DBNull))
{
dataList.Add(item.ToString());
}
}
}

/// close and release database connection
excelDatabase.Close();

return dataList;
}

這裡值得注意的是,如果試算表中有些欄位是空的
讀出來的資料會是DBNull的型別,其餘則會是string的型別

另外,如果是手動輸入試算表名稱的話
要記得在試算表名稱後面加一個$,例如預設的"Sheet1$"

--
參考資料
轉錄 C# 讀取 Excel
C# 讀取 Excel
DataTable 類別

在C#中讀取Excel的試算表名稱

在將Excel的檔案當做資料庫的存取的時候
可以先取得檔案中每個試算表的名稱,再做處理

public List LoadExcelSheetNameList(
string excelFile)
{
List sheetNameList = new List();

/// load excel file as an ole database
OleDbConnection excelDatabase =
new OleDbConnection(string.Format(
"Provider = Microsoft.Jet.OLEDB.4.0;" +
"Data Source = {0};" +
"Extended Properties='Excel 8.0;HDR=No'",
excelFile));
excelDatabase.Open();

/// load excel sheet as DataRow
DataRow[] sheetList =
excelDatabase.GetSchema("Tables").Select();
foreach (DataRow sheet in sheetList)
{
/// query each sheet name from excel file
sheetNameList.Add(
sheet["TABLE_NAME"] as string);
}

/// close and release database connection
excelDatabase.Close();

return sheetNameList;
}

在得到名稱後,就可以針對單一的試算表進行讀取

--
參考資料
[工作] 取得Excel頁籤名稱
如何取得 Excel 中的 Sheet Name

2010年12月27日 星期一

在C#中使用SQLite資料庫

自己開發程式的時候,想用資料庫又不希望花一大筆錢
常常會使用SQLite,一個輕量級的嵌入式資料庫系統(僅單一檔案)
由於.net原生並不支援SQLite
可以去System.Data.SQLite找到在公開的函式庫
注意如果是x64的程式,則需要使用x64版本的函式庫,無法混用

在每次使用資料庫的時候,都需要建立與相關資料庫的連結

private SQLiteConnection ConnectDatabase()
{
string path = "Test.db";
string password = "Password";
SQLiteConnection connection;

if (!File.Exists(_databasePath))
{
/// for non-exist database, create it
SQLiteConnection.CreateFile(path);
connection = new SQLiteConnection(
"Data Source = " + path);
connection.Open();
connection.ChangePassword(password);
}
else
{
/// for exist database, connect it
connection = new SQLiteConnection(
"Data Source = " + path);
connection.SetPassword(password);
connection.Open();
}

return connection;
}

這邊要注意的是,由於SQLite本身並沒有支援資料庫加密
有關Password的功能(紅字部分)是System.Data.SQLite實做的
所以製作出來的加密資料庫並不能被其他的SQLite應用讀取
(例如Firefox的附加元件SQLite Manager)
所以如果不打算加密,建議將紅字部分拿掉

在連結之後,就可以透過該連結,執行SQL的命令

private void RunCommand(
SQLiteConnection connection, string commandText)
{
SQLiteCommand command =
new SQLiteCommand(connection);
command.CommandText = commandText;
command.ExecuteNonQuery();
}

除了不需要回傳值的命令(例如CREATE TABLE)以外
SQL最重要的當然是Query的指令

private List RunQueryCommand(
SQLiteConnection connection, string commandText)
{
List<string> result = new List<string>();

SQLiteCommand command =
new SQLiteCommand(connection);
command.CommandText = commandText;

using (SQLiteDataReader queryResult =
command.ExecuteReader())
{
/// read one row one time
while (queryResult.Read())
{
/// change index to get different column
result.Add(queryResult.GetValue(0)
.ToString());
}
}

return result;
}

當然,在使用完畢後一定要記得將連結中止,否則資料庫檔案會被鎖住

private void DisconnectDatabase(
SQLiteConnection connection)
{
connection.Close();
}

另外,讀取資料庫的時候,如果不能肯定資料表是否存在
則需要先做一個檢查,否則會跳出例外狀況
(當然也是可以直接用try catch將Command包住,端看習慣)

private bool IsTableExist(
SQLiteConnection connection, string name)
{
return connection.GetSchema("Tables")
.Select("Table_Name = '" + name + "'")
.Length > 0;
}

--
參考資料
SQLite 簡介
System.Data.SQLite
C sharp or .Net 使用sqlite 設定
SQLite Manager
SQL語法教學
Check if table exists

Windows的顯示/隱藏桌面

在Windows XP預設的快速啟動列中會有一個捷徑,可以顯示/隱藏桌面
(隱藏/顯示所有已經開啟的視窗)
在XP的時候有時候會不小心砍掉(Win7中已經被放在視窗的右下角,反正也移除不掉,就不會有這個困擾),這時候可以自己重新做一個捷徑

先開一個純文字檔,內容如下

[Shell]
Command=2
IconFile=explorer.exe,3
[Taskbar]
Command=ToggleDesktop

並將檔案附檔名改為.scf(檔名倒是無所謂,一般習慣設成"ShowDesktop.scf"或"顯示桌面.scf")就可以了

如果想要在程式中做出同樣的功能,則可以呼叫Shell.Application去呼叫ToggleDesktop這個命令

void ShowDesktop()
{
Type shell =
Type.GetTypeFromProgID("Shell.Application");
shell.InvokeMember("ToggleDesktop",
BindingFlags.InvokeMethod, null,
Activator.CreateInstance(shell), null);
}

--
參考資料
How to re-create the Show desktop icon on the Quick Launch toolbar in Windows XP
C#使用系統的「顯示桌面」功能(Shell.Application)

2010年12月21日 星期二

在WPF中發出鍵盤事件

WPF沒有控制鍵盤的API
所以要發出鍵盤事件(例如按下"J")就必須要呼叫Win32的API了

private enum KeyEventFlag
{
KEYEVENTF_KEYDOWN = 0x0000,
KEYEVENTF_EXTENDEDKEY = 0x0001,
KEYEVENTF_KEYUP = 0x0002,
}

[DllImport("user32.dll", SetLastError = true)]
private static extern void keybd_event(
byte bVk, byte bScan, KeyEventFlag dwFlags,
IntPtr dwExtraInfo);

這時發生一個問題,bVk是以Win32中定義的Virtual-Key Codes做為對照
但是在WPF中所採用的是Key 列舉型別
需要使用KeyInterop做轉換,所以實際上發出按下鍵盤的函式如下

private void SendKeyDown(Key key)
{
keybd_event(
(byte)KeyInterop.VirtualKeyFromKey(key), 0,
KeyEventFlag.KEYEVENTF_KEYDOWN, IntPtr.Zero);
}

另外,如果要送出放開鍵盤的事件,那就把KEYEVENTF_KEYDOWN換成KEYEVENTF_KEYUP,而連續送出一個按下加上一個放開,就變成Click了
同理,要發出復合鍵則是再放開前按下所有鍵,再放開即可

--
參考資料
.NET - How can I convert 'System.Windows.Input.Key' to 'System.Windows.Forms.Keys'?

2010年9月3日 星期五

在C#中確認視窗是否是全螢幕

要確認一個視窗是否是全螢幕
可以直接比對視窗的大小是否與螢幕大小相同
因為如果不是全螢幕的視窗,那至少會有一部分被工具列佔走

public struct RECT
{
public int left;
public int top;
public int right;
public int bottom;
}

[DllImport("user32.dll")]
private static extern int GetWindowRect(
IntPtr hWnd, out RECT lpRect);

bool IsFullScreen(IntPtr h)
{
/// get window bound from handle
RECT b;
GetWindowRect(h, out b);

/// get screen bound from handle
Rectangle r = Screen.FromHandle(h).Bounds;

/// check if the two size is the same
if ((b.bottom - b.top) == r.Height &&
(b.right - b.left) == r.Width)
{
return true;
}

return false;
}

注意Screen這個類別是宣告在System.Windows.Forms裡面
還有Rectangle是宣告在System.Drawing裡面
所以如果是WPF的程式,則需要另外新增參考

--
參考資料
GetWindowRect Function
RECT Structure
Screen.FromHandle 方法
Detect whether active window is full screen

在C#中取得前景視窗(ForegroundWindow)的應用程式名稱

如果在寫工具類的程式,有時會需要知道目前前景的視窗
(Foreground,也就是持有Focus的視窗)
這時候可以透過Win32的API來取得相關的資訊

[DllImport("user32.dll")]
static extern IntPtr GetForegroundWindow();

[DllImport("user32.dll")]
public static extern int GetWindowThreadProcessId(
IntPtr hWnd, out int lpdwProcessId);

string GetForegroundApplicationName()
{
/// get foreground window handle
IntPtr h = GetForegroundWindow();

/// get foreground process from handle
int pId;
GetWindowThreadProcessId(h, out pId);
Process p = Process.GetProcessById(pId);

return p.ProcessName;
}

--
參考資料
GetForegroundWindow Function
GetWindowThreadProcessId Function
Process.GetProcessById 方法 (Int32)

2010年7月16日 星期五

查找註冊表的變動(WinDiff)

在寫Windows程式時,如果遇到比較冷門的功能
常常會遇到怎麼找都找不到API的狀況(甚至上msdn也沒人回應)
如果這時候你發現其實有手動的方式可以達到同樣的目的
(例如之前提過的DPI Virtualization)
那就可以考慮一下去比對註冊表的變動了

在Windows系統中幾乎所有的變動都會改變註冊表
在執行列打入regedit就可以看到一堆機碼
基本上真的無從找起

這時候就要用到WinDiff工具了
可以參考如何使用 Windiff.exe 公用程式
這個工具可以讓你比對兩個文字檔案,找到並瀏覽差異

1. 在做想要達到目的的操作前,先將註冊表匯出成文字檔
2. 做手動的操作
3. 重開註冊表,並匯出成另一個文字檔
4. 開啟WinDiff,從表單中選取File->CompareFiles...
並分別選取兩個文字檔
5. 如果兩個檔案相同,會顯示identical的訊息
6. 如果不同,會顯示紅字,雙擊紅字就會展開整份檔案
7. 首先會到第一筆差異處,利用下一筆(F8)或上一筆(F7)瀏覽

接下來就是用眼睛比對了
通常你會發現一些關鍵字出現,就是你要找的了
這裡有幾點需要注意的
1. 整份註冊表還蠻大的(100MB+是正常的)
可以考慮針對有關的註冊表查找,或是分成很多個表匯出
這樣可以節省比對的時間
2. 使用WinDiff比對完一對檔案後,最好是重開後再比對下一份
因為似乎還是會占用記憶體,所以會變慢很多
3. 一個動作可能會更動到註冊表的很多地方
就算已經找到,還是建議繼續搜索完其他的部分

在找到差異後,就可以透過編輯註冊表的API來做同樣的調整了
例如DPI Virtualization中的方法
不過這邊要強調,這種做法其實有一定的風險
(當然,如果只是檢查倒是無所謂,但是有修改就很難說了)
你有可能有漏掉沒有改到的地方(造成註冊表的關聯錯誤)
建議是先在測試的機器(可隨時重新安裝的電腦)上,手動做幾次
如果確定穩定而且達到目的的話再用程式去改

--
參考資料
如何使用 Windiff.exe 公用程式

2010年6月24日 星期四

在C#中啟動服務(Service)

在Windows系統裡面有非常多的服務
但是有些時後服務並不會自動開啟
例如快速插拔硬體後,有些相關的服務會沒有被啟動(例如手寫板)
所以這時候就需要另外啟動這些服務了

如果要手動啟動這些服務,可以到
控制台->系統管理工具->服務
找到相關的服務並按滑鼠右鍵啟動

但是有時候在程式進行中一樣會發現服務沒被啟動
就需要用ServiceController去操作服務的狀態了

private void StartService(string s)
{
try
{
ServiceController sc = new ServiceController(s);

/// if service is stopped, start it
if (sc.Status ==
ServiceControllerStatus.Stopped)
{
/// start the service
sc.Start();
sc.WaitForStatus(
ServiceControllerStatus.Running);
}
}
catch (Exception e)
{
Console.WriteLine(
"Exception : ", e.Message);
}
}

因為服務名稱可能傳入錯誤,或是在該裝置上沒有該服務
(例如一般XP上面沒有觸控筆的服務)
所以在使用的時候建議使用try-catch

傳入的參數就是服務的名稱,例如觸控筆的服務

StartService("TabletInputService");

--
參考資料
ServiceController 類別
StartService Function

2010年5月28日 星期五

在C#中啟用及關閉多點觸控

在.net 4還沒有完全成熟之前,要開發win7的多點觸控程式
可以透過Windows 7 Multitouch .NET Interop Sample Library
請參考建立多點觸控應用程式

但是有時候並不希望另外使用其他的函式庫
這時候可以透過簡單的Win32 API達到同樣的效果

[DllImport("User32.dll", SetLastError = true)]
public static extern bool SetProp(
IntPtr hWnd, string lpString, IntPtr hData);

[DllImport("User32.dll", SetLastError = true)]
public static extern IntPtr GetProp(
IntPtr hWnd, string lpString);

const int TABLET_ENABLE_MULTITOUCHDATA = 0x01000000;
const string TPS = "MicrosoftTabletPenServiceProperty";

bool EnableMultiStylus()
{
/// get current window handle
Window w = Application.Current.MainWindow;
IntPtr h = new WindowInteropHelper(w).Handle;

/// get current tablet property
IntPtr tp = GetProp(h, TPS);

/// set with enabled multi-touch flag
return SetProp(h, TPS,
new IntPtr(tp.ToInt32() |
TABLET_ENABLE_MULTITOUCHDATA));
}

在這之後就可以直接使用stylus的事件來接收多個觸控點的事件
不過這時候如果註冊了滑鼠事件,就會發現滑鼠事件也被影響了
第二點下去及動作同時也會觸發滑鼠事件,進而造成困擾
(因為滑鼠事件沒辦法判斷哪個事件是由哪個點引發的)
所以記得在不需要使用的時候把多點觸控事件給關掉

bool DisableMultiStylus()
{
/// get current window handle
Window w = Application.Current.MainWindow;
IntPtr h = new WindowInteropHelper(w).Handle;

/// get current tablet property
IntPtr tp = GetProp(h, TPS);

/// set with disabled multi-touch flag
return SetProp(h, TPS,
new IntPtr(tp.ToInt32() &
~TABLET_ENABLE_MULTITOUCHDATA));
}

--
參考資料
建立多點觸控應用程式
SetProp Function
GetProp Function
IRealTimeStylus3::MultiTouchEnabled Property

2010年5月27日 星期四

在C#中做字串分析

C#中的字串本身就有一些簡單的分析,例如Contains或EndsWith
但是如果是比較複雜的判斷,例如是否全部由字母構成
就需要使用正規表式(Regular Expression)來判斷了

bool IsAlpha(string s)
{
return !Regex.IsMatch(s, "[^a-zA-Z]");
}

用正規表式來確認字串規則時,會在字串中進行搜索
所以如果要判斷一個字串是否滿足"全部都由字母構成"
實際上得去判斷是否沒有"其餘字符存在"

另外,正規表式也可以做成執行個體

bool IsAlpha(string s)
{
Regex r = new Regex("[^a-zA-Z]");

return !r.IsMatch(s);
}

注意這裏的執行個體中的規則是不可變的
所以如果有大量的運算都需要用到同樣的規則再這樣使用
否則用靜態的方式會比較有彈性

--
參考資料
Regular Expressions Usage in C#
正規表式
Regex 類別
Regex.IsMatch 方法

2010年5月25日 星期二

將WPF介面多國語言化(Localization)

要將WPF介面變成支援多國語言首先要注意一個問題
因為介面可能同時定義在XAML或C#檔案中
所以如果使用傳統的resx或是單純讀文字檔的方法是沒辦法直接做到的
(當然,如果把所有的介面文字都使用C#定義也是可行
不過這樣就不太符合WPF的精神了)

這時候需要加入新的資源字典(ResourceDictionary)

資源字典是一個XAML檔案,通常的命名會以CultureInfo的Name命名
(例如en-US.xaml或zh-TW.xaml)
這邊我們定義了一系列的字串,並賦予對應的索引(key)

<ResourceDictionary
...
xmlns:sys="clr-namespace:System;assembly=mscorlib">

<sys:String x:Key="OK">
OK
</sys:String>
<sys:String x:Key="Msg">
Msg
</sys:String>
</ResourceDictionary>

繁體中文的語系檔如下

<ResourceDictionary
...
xmlns:sys="clr-namespace:System;assembly=mscorlib">

<sys:String x:Key="OK">
確定
</sys:String>
<sys:String x:Key="Msg">
訊息
</sys:String>
</ResourceDictionary>

必須注意的是,此時此資源字典的BuildAction可以設定為Page或Content

設為Page的時候,此檔案會直接被包含到應用程式中
通常在預設語系會採用此種做法(確保至少有一種語言字典可以被找到)

而設成Content的時候,將會將此檔案獨立出來
此時,複製到輸出目錄(CopyToOutputDirectory)
需設成有更新時才複製(Copy if newer)或永遠複製(Copy always)

這種方式的好處是可以彈性的加入或移除某種語系的支援而不需要重新編譯
但是就可能會有很多檔案,在發佈的時候會造成一些麻煩
而且使用者可以任意的改動語系檔案,可能造成其他的錯誤

另外一種就是將非預設語系都包成另一個Dll(全部都設成page)
動態載入需要的語系,這樣一樣可以在不需要重新編譯程式的狀態下換語系檔
也可以保有語系檔的封閉性,只是在讀的時候可能會稍微麻煩一些
可以參考在WPF中引用被封裝的資源檔(影像)

在定義資源檔後,可以透過

private void LoadLanguage()
{
ResourceDictionary rd = null;

/// get current culture name
string lang = CultureInfo.CurrentCulture.Name;

try
{
rd = Application.LoadComponent(
new Uri(lang + " .xaml", UriKind.Relative))
as ResourceDictionary;
}
catch
{
}

if (rd != null)
{
/// find current lang xaml, replace default
if (Resources.MergedDictionaries.Count > 0)
{
Resources.MergedDictionaries.Clear();
}
Resources.MergedDictionaries.Add(rd);
}
}

將語系檔載入到應用程式的資源裡面

而在使用的地方則可以使用DynamicResource去讀取

<Button Content="{DynamicResource OK}"
Click="BtnClick" />

如果是在C#檔裡則是可以用FindResource去讀

private void BtnClick(object sender, RoutedEventArgs e)
{
MessageBox.Show(FindResources("Msg") as string);
}

此時會從物件本身開始向上查找,直到找到或Application層級為止

--
參考資料
關於讓WPF軟件界面支持全球化和本地化
WPF - Resource
FrameworkElement.FindResource 方法
資源概觀

2010年5月19日 星期三

在WPF中觸控事件的捕捉

在WPF中觸控事件(Stylus Event)傳遞
我們可以觀察到一般觸控事件的傳遞
但是如果我們在中間的矩形按下,卻移開到視窗之外再釋放
那Up的事件全部都不會發生了,這時候就需要用到捕捉了

捕捉有兩種,CaptureMouse以及CaptureStylus
經過實際測試,這兩個動作是完全一致的
(也許是為了讓寫觸控AP的RD不要更動太多)

先在PreviewMouseLeftButtonDown的地方做CaptureMouse

private void CMouseEH(object sender, RoutedEventArgs e)
{
(sender as FrameworkElement).CaptureMouse();
Console.WriteLine(
(sender as FrameworkElement).Name + " : " +
e.RoutedEvent.Name);
}

記得要在對應的地方(PreviewMouseLeftButtonUp)將滑鼠捕捉釋放掉

private void RMouseEH(object sender, RoutedEventArgs e)
{
(sender as FrameworkElement).ReleaseMouseCapture();
Console.WriteLine(
(sender as FrameworkElement).Name + " : " +
e.RoutedEvent.Name);
}

為了更清楚的看出捕捉的效果,我們將這兩個事件放在Grd上
得出的結果如下

Win : PreviewStylusDown
Grd : PreviewStylusDown
Rec : PreviewStylusDown
Rec : StylusDown
Grd : StylusDown
Win : StylusDown
Win : PreviewMouseLeftButtonDown
Grd : PreviewMouseLeftButtonDown
Rec : PreviewMouseLeftButtonDown
Grd : MouseLeftButtonDown
Win : MouseLeftButtonDown
Win : PreviewStylusUp
Grd : PreviewStylusUp
Grd : StylusUp
Win : StylusUp
Win : PreviewMouseLeftButtonUp
Grd : PreviewMouseLeftButtonUp
Rec : MouseLeftButtonUp
Grd : MouseLeftButtonUp
Win : MouseLeftButtonUp

而如果在PreviewStylus事件中捕捉Stylus的話
結果如下

Win : PreviewStylusDown
Grd : PreviewStylusDown
Rec : PreviewStylusDown
Grd : StylusDown
Win : StylusDown
Win : PreviewMouseLeftButtonDown
Grd : PreviewMouseLeftButtonDown
Grd : MouseLeftButtonDown
Win : MouseLeftButtonDown
Win : PreviewStylusUp
Grd : PreviewStylusUp
Rec : StylusUp
Grd : StylusUp
Win : StylusUp
Win : PreviewMouseLeftButtonUp
Grd : PreviewMouseLeftButtonUp
Rec : PreviewMouseLeftButtonUp
Rec : MouseLeftButtonUp
Grd : MouseLeftButtonUp
Win : MouseLeftButtonUp

從上面兩個結果中可以看出
不論是在滑鼠或是觸控事件中捕捉,都會將該事件繼續傳遞下去
但在該事件傳遞結束後到觸發釋放事件傳遞結束前
所有下層的物件都不再收到任何滑鼠或觸控的事件

在WPF中觸控事件(Stylus Event)傳遞

在單點觸控發生時,Windows會觸發Stylus及Mouse的事件
參考在WPF中滑鼠事件(Mouse Event)傳遞中使用的結構

<Window ... Name="Win">
<Grid Name="Grd">
<Rectangle Name="Rec" />
</Grid>
</Window>

因為我們這次觀察的重點是Mouse跟Stylus的交互作用
所以觀察的事件如下
事件
PreviewMouseLeftButtonDown
PreviewMouseLeftButtonUp
MouseLeftButtonDown
MouseLeftButtonUp
PreviewStylusDown
PreviewStylusUp
StylusDown
StylusUp

同樣,將觀察的事件都套用到相同的事件處理函式
依照在WPF中滑鼠事件(Mouse Event)傳遞所作的設定
出來的結果會是

Win : PreviewStylusDown
Grd : PreviewStylusDown
Rec : PreviewStylusDown
Rec : StylusDown
Grd : StylusDown
Win : StylusDown
Win : PreviewMouseLeftButtonDown
Grd : PreviewMouseLeftButtonDown
Rec : PreviewMouseLeftButtonDown
Rec : MouseLeftButtonDown
Grd : MouseLeftButtonDown
Win : MouseLeftButtonDown
Win : PreviewStylusUp
Grd : PreviewStylusUp
Rec : PreviewStylusUp
Rec : StylusUp
Grd : StylusUp
Win : StylusUp
Win : PreviewMouseLeftButtonUp
Grd : PreviewMouseLeftButtonUp
Rec : PreviewMouseLeftButtonUp
Rec : MouseLeftButtonUp
Grd : MouseLeftButtonUp
Win : MouseLeftButtonUp

從這例子中可以看出Stylus的事件會全部發生完才發生Mouse事件
而Stylus事件上下層間的傳遞也如同Mouse事件一般

2010年5月14日 星期五

在C#中將數值轉字串

在C#中要將一個數值表示成字串可以直接使用ToString的方法
不過在不同的地方可能需要不同的表示法
這時候就要使用ToString(String format)
透過format來定義字串的格式
比較常用的如下
格式說明
0固定位數數值字串使用,若該位數不存在則填0
#非固定位數數值字串使用,若該位數不存在則不會出現
E或e科學記號(指數)表示法
X或x16進位表示法,僅用於整數數值


void ToStringSample()
{
double n1 = 12.12;
Console.WriteLine(n1.ToString("000.000"));
/// 012.120
Console.WriteLine(n1.ToString("###.###"));
/// 12.12
Console.WriteLine(n1.ToString("E"));
/// 1.212000E+001

double n2 = 1234.1234;
Console.WriteLine(n2.ToString("000.000"));
/// 1234.123
Console.WriteLine(n2.ToString("###.###"));
/// 1234.123
Console.WriteLine(n2.ToString("E"));
/// 1.234123E+003

double n3 = 0.05;
Console.WriteLine(n3.ToString("000.000"));
/// 000.050
Console.WriteLine(n3.ToString("###.###"));
/// .05
Console.WriteLine(n3.ToString("E"));
/// 5.000000E-002

int n4 = 123456;
Console.WriteLine(n4.ToString("000.000"));
/// 123456.000
Console.WriteLine(n4.ToString("E"));
/// 123456
Console.WriteLine(n4.ToString("###.###"));
/// 1.234560E+005
Console.WriteLine(n4.ToString("X"));
/// 1E240
}

數值的表示法真的很多,真的需要的話可以直接從MSDN裡面找

--
參考資料
Double.ToString 方法 (String)
標準數值格式字串
自訂數值格式字串
Double.ToString如何指定小數點後的精度

在WPF中宣告非公開類別(internal class)

在製作動態連結函式庫(DLL)的時候
有時候會用到一些非公開的類別(在內部使用,卻無法被外部的專案參考)
在C#中僅需在宣告的時候將類別修飾詞改為internal即可
(或是不要用修飾詞,預設即為internal)

internal class Class1
{
}

但如果使用WPF的時候在DLL裡面使用了
UserControl或是像Window等使用XAML宣告的類別時
預設的partial class會是public的
(此時即使沒有使用修飾詞也會預設為public)

如果將cs檔的partial class宣告為internal partial class
編譯時會出現錯誤
原因是XAML會在編譯時自動使用修飾詞public
所以兩個部分類別的修飾不同而造成錯誤
此時就要用x:ClassModifier去設定編譯時使用的修飾詞

<UserControl
x:Class="test_wpf.UserControl1"
x:ClassModifier="internal"
...>
...
</UserControl>

此時cs檔對應的類別就要改成

namespace test_wpf
{
internal partial class UserControl1 : UserControl
{
}
}

或是將修飾詞去掉,就會使用XAML設定的修飾辭為預設

--
參考資料
WPF's Use of Partial Classes' Access Modifiers
x:ClassModifier 屬性

2010年4月2日 星期五

在WPF中捕捉螢幕畫面(ScreenShot)

WPF中沒有直接可以捕捉螢幕畫面的物件或函式
不過可以使用.net Form的方法做到,先加入參考System.Drawing

Bitmap CaptureScreen()
{
/// new a bitmap with screen width and height
Bitmap b = new Bitmap(
(int)SystemParameters.PrimaryScreenWidth,
(int)SystemParameters.PrimaryScreenHeight);

/// copy screen through .net form api
using (Graphics g = Graphics.FromImage(b))
{
g.CopyFromScreen(0, 0, 0, 0,
b.Size, CopyPixelOperation.SourceCopy);
}

return b;
}

這時候得到的是Form使用的Bitmap物件
如果要存成圖檔的話就可以直接使用Bitmap物件的Save

void SaveBitmap(Bitmap b, string f)
{
b.Save(f);
}

或是再把它轉換成WPF使用的BitmapSource

[DllImport("gdi32.dll")]
[return: MarshalAs(UnmanagedType.Bool)]
static extern bool DeleteObject(IntPtr hObject);

private static BitmapSource ToBitmapSource(Bitmap b)
{
/// transform to hbitmap image
IntPtr hb = b.GetHbitmap();

/// convert hbitmap to bitmap source
BitmapSource bs =
Imaging.CreateBitmapSourceFromHBitmap(
hb, IntPtr.Zero, Int32Rect.Empty,
BitmapSizeOptions.FromEmptyOptions());

/// release temp hbitmap image
DeleteObject(hb);

return bs;
}

不過由於透明背景的視窗會被放在不同層的顯示記憶體中
這也造成了使用上面的捕捉畫面方法會抓不到透明的視窗
如果希望抓到的畫面包括這樣的視窗,那就要直接用Win32的GDI+函式了

const uint SRCCOPY = 0x00CC0020;
const uint CAPTUREBLT = 0x40000000;

[DllImport("user32.dll")]
static extern IntPtr GetDesktopWindow();

[DllImport("user32.dll")]
static extern IntPtr GetDC(IntPtr hWnd);

[DllImport("gdi32.dll")]
[return: MarshalAs(UnmanagedType.Bool)]
static extern bool BitBlt(IntPtr hdcDest, int nXDest,
int nYDest, int nWidth, int nHeight, IntPtr hdcSrc,
int nXSrc, int nYSrc, uint dwRop);

[DllImport("user32.dll")]
static extern IntPtr ReleaseDC(IntPtr hWnd, IntPtr hDC);

void CaptureScreen()
{
/// new a bitmap with screen width and height
Bitmap b = new Bitmap(
(int)SystemParameters.PrimaryScreenWidth,
(int)SystemParameters.PrimaryScreenHeight);

/// copy screen through gdi+ api
using (Graphics g = Graphics.FromImage(b))
{
IntPtr hdc = g.GetHdc();
IntPtr dh = GetDesktopWindow();
IntPtr dhdc = GetDC(dh);
BitBlt(hdc, 0, 0,
(int)SystemParameters.PrimaryScreenWidth,
(int)SystemParameters.PrimaryScreenHeight,
dhdc, 0, 0, SRCCOPY | CAPTUREBLT);

/// release and dispose unmanaged resources
ReleaseDC(dh, dhdc);
g.ReleaseHdc();
hdc = IntPtr.Zero;
dh = IntPtr.Zero;
}
}

這樣就可以抓到透明背景的視窗
但是如果仔細看的話會發現在抓圖的時候,滑鼠游標會有一個閃爍
(需要連續一直抓比較明顯,直接抓是看不太出來的)
這是因為透明圖層跟滑鼠游標是在同一層
但是BitBlt的原則是不要抓到滑鼠游標
所以會再抓取透明圖層的時候會先將滑鼠變不見

--
參考資料
ScreenShot Application in WPF using GD+
BitBlt (gdi32)
The Case of the Disappearing Cursor

2010年4月1日 星期四

在WPF中的形狀(Shape)增加虛線框

在Shape中要加上框線很簡單
只要設定框線的顏色和粗細就好

<Rectangle Stroke="Black" StrokeThickness="2" />

再設定框線變成虛線

<Rectangle Stroke="Black" StrokeThickness="2"
StrokeDashArray="3 5" />

這裡需要兩個數字,一個是虛線中的線段長度
另一個是虛線中的空間長度,單位都是框線的粗度
所以上面例子是粗度為2像素,而每6像素就會空白10像素的長方形外框

--
參考資料
Shape.StrokeDashArray 屬性

2010年3月23日 星期二

在C#中使用Unmanagement函式(DllImport)

要在Management程式(.net程式)中使用舊有的Unmanagement函式,例如User32裡面的API,需要使用DllImport來做轉換,最單純的用法就像在在WPF中取得螢幕的解析度中使用的GetSystemMetrics

[DllImport("user32.dll")]
static extern int GetSystemMetrics(int nIndex);

這裡僅需要知道這個函式寫在哪個dll,以及傳入傳出的參數形態就可以
簡單的形態轉換可以參考Managed and Un-Managed Code in .NET

在這邊有幾個可以注意的地方
第一個是可以做函式名稱的轉換(為了統一命名規則之類的原因)

[DllImport("user32.dll") EntryPoint="GetSystemMetrics")]
static extern int gsm(int nIndex);

依照這樣的寫法就可以用一個gsm的函式呼叫原本在User32中叫做GetSystemMetrics的函式

另一個是如果回傳是BOOLEAN的型別,則需要用MarshalAs來轉換,例如

BOOLEAN BoolFunction();

就需要寫成

[DllImport("a.dll")]
[return: MarshalAs(UnmanagedType.U1)]
static bool BoolFunction();


--
參考資料
請以 MarshalAs 標記布林 P/Invoke 引數
指定進入點
Managed and Un-Managed Code in .NET
UnmanagedType 列舉型別

2010年3月22日 星期一

在WPF中使用部分影像筆刷

在WPF中使用影像筆刷(ImageBrush)可以很容易的將文字或是圖形使用想要用的圖片填滿,可以參考在WPF中使用影像筆刷(ImageBrush)

不過有時候我們不想要用整張圖填滿,這時候就需要用ViewBox了
直接設定一個Rect去限定圖片中的某個範圍
然後再依照Stretch的屬性去填滿

private void SetViewBox(ImageBrush ib, Rect r)
{
ib.ViewboxUnits = BrushMappingMode.Absolute;
ib.Viewbox = r;
}

這裡採用的是絕對座標
也可以使用相對的方法(BrushMappingMode.RelativeToBoundingBox)
那傳入的Rect就要變成相對於整張圖的座標
例如(0,0,0.5,0.5)就是左上角的四分之一張圖

--
參考資料
TileBrush.Viewbox 屬性

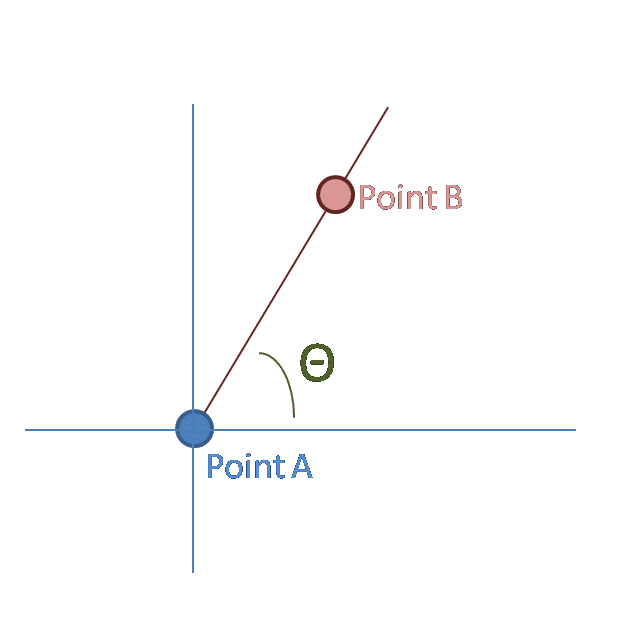
在C#中計算角度

在一些圖形回饋的程式中(比如比較炫麗的圓形操控程式)
常會需要計算單點對應到另一個點的旋轉角度

一般的想法就是先算兩點的向量,然後除成tan
再用Math裡面的atan去反推回角度
需要考慮分母為零或是正負號的問題

但其實在Math另外有一個atan2的函式可以直接透過兩點的向量算出角度

private double CalAngle(Point pa, Point pb)
{
/// Y alias is reverse from Cartesian plane
return Math.Atan2(pa.Y - pb.Y, pb.X - pa.X);
}

記得在笛卡爾座標系跟螢幕上的座標的Y軸是反向的
所以計算要反過來減

--
參考資料
Math.Atan2 方法

2010年3月15日 星期一

在WPF中取得像素顏色(Pick Color)

在寫調色盤介面的時候,需要在一張圖透過滑鼠去選取顏色

一個很簡單的做法就是使用一個Image控制項,加上MouseDown事件
另外加一個色塊去表示取出的顏色

<StackPanel>
<!-- an image to pick color from -->
<Image Name="img" Source="color.png"
MouseDown="Image_MouseDown" />
<!-- an rectangle to output picked color -->
<Rectangle Name="rec" Height="20" />
</StackPanel>

然後將MouseDown的事件處理定義如下

private void Image_MouseDown(
object sender, MouseButtonEventArgs e)
{
/// get a bitmap reference
BitmapSource bmp = img.Source as BitmapSource;

/// get mouse down position
Point pos = e.GetPosition(img);

/// map position to pixel base
int x = (int)((pos.X / img.ActualWidth) *
bmp.PixelWidth);
int y = (int)((pos.Y / img.ActualHeight) *
bmp.PixelHeight);

/// pick the color to a byte array
CroppedBitmap cb = new CroppedBitmap(
bmp, new Int32Rect(x, y, 1, 1));
byte[] pix = new byte[4];
cb.CopyPixels(pix, 4, 0);

/// show the picked color
rec.Fill = new SolidColorBrush(
Color.FromRgb(pix[2], pix[1], pix[0]));
}

這樣在程式中點那張圖的時候
下方的長方形圖快就會被填滿為點下選取到的顏色

注意這邊我們對應到圖片的位置的時候
要轉換成PixelWidth & PixelHeight
因為圖片本身的dpi可能不同
直接使用圖片的大小可能會對應錯誤或超出範圍

--
參考資料
WPF : A Simple Color Picker With Preview
BitmapSource.CopyPixels 方法 (Array, Int32, Int32)

2010年2月23日 星期二

DPI Virtualization

這是一個在Vista之後才出現的系統設定
目的是要讓一些原本不是DPI aware的應用程式
可以達到如同DPI aware(WPF視窗都屬於此類)一樣的效果
根據微軟的說法,是希望在各種屬性的平台上面都可以有舒適的效果
請參考Writing High-DPI Win32 Applications - DPI Virtualization

舉例來說,在Win7同樣是1920x1080的解析度之下
同樣透過GetSystemMetrics這個API去讀取解析度
DPI 設定WPF視窗WinForm視窗Win32 Console
100% (96)1920x10801920x10801920x1080
125% (120)1920x10801920x10801920x1080
150% (144)1920x10801280x7201280x720

在DPI=144(150%)的時候,非DPI aware的程式會將解析度自動調整
參考在WPF中取得螢幕的解析度
就發現在WPF程式中使用SystemParameters會得到一樣的結果
這是因為預設在150%以上的時候,DPI Virtualization會被啟動
如果點選自訂DPI設定,就會發現Use Windows XP Style DPI Scaling沒有被勾選了(在100%或是125%則是預設被勾選的)

如果只是在WPF中或是純粹在WinForm底下做處理倒是沒關係
但是有時候會有透過舊有的程式取得資訊的時候
這時候如果不知道DPI Virtualization的設定
就可能出現一些非預期的結果
(請在Win7 150%的設定下VS2008按滑鼠右鍵就知道我在說什麼)

我在MSDN上面提問,但是卻沒有回應,應該是沒有提供這樣的API
不過因為系統設定基本上都會寫在註冊表中
所以我就直接對在同樣設定下,diff有沒有勾選該選項的註冊表
發現其中有一個值是會跟著改變的

[HKEY_CURRENT_USER\Software\Microsoft\Windows\DWM]
"UseDpiScaling"=dword:00000000

所以透過讀取註冊表的API就可以判斷是否有DPI Virtualization的設定

bool IsDpiVirtualization()
{
/// open the key of Desktop Window Manager
RegistryKey k = Registry.CurrentUser.OpenSubKey(
"Software\\Microsoft\\Windows\\DWM");

if (k != null)
{
/// get the value if it exists
if ((int)k.GetValue("UseDpiScaling", 0) == 1)
{
k.Close();
return true;
}
k.Close();
}
return false;
}

--
參考資料
Writing High-DPI Win32 Applications
Current Word - 「XP Style DPI Scaling」
API to get "Use Windows XP Style DPI Scaling" setting
RegistryKey.OpenSubKey 方法
Registry.GetValue 方法

在WPF中取得DPI的設定

要取得DPI的設定,需要一個針對一個視窗
在WPF中可以透過主視窗來取得形變的比率
再乘上預設的DPI(96)即可

void GetDpiSetting(
out double DpiX, out double DpiY)
{
const double DEFAULT_DPI = 96.0;

/// get transform matrix from current main window
Matrix m = PresentationSource
.FromVisual(Application.Current.MainWindow)
.CompositionTarget.TransformToDevice;

/// scale default dpi
DpiX = m.M11 * DEFAULT_DPI;
DpiY = m.M22 * DEFAULT_DPI;
}

另外習慣使用Win32的程式設計師
一樣可以使用GetDeviceCaps取得DPI的設定

const int LOGPIXELSX = 88;
const int LOGPIXELSY = 90;

[DllImport("gdi32.dll")]
static extern int GetDeviceCaps(IntPtr hdc, int Index);

[DllImport("user32.dll")]
static extern IntPtr GetDC(IntPtr Hwnd);

void GetDpiSetting(
out double DpiX, out double DpiY)
{
/// get desktop dc
IntPtr h = GetDC(IntPtr.Zero);

/// get dpi from dc
DpiX = GetDeviceCaps(h, LOGPIXELSX);
DpiY = GetDeviceCaps(h, LOGPIXELSY);
}

--
參考資料
Getting system DPI in WPF app
GetDeviceCaps Function

在WPF中取得螢幕的解析度

在WPF中有一個很簡單可以取得系統設定的類別
所以可以直接透過SystemParameters取得主螢幕的解析度

Size GetScreenResolution()
{
return new Size(
SystemParameters.PrimaryScreenWidth,
SystemParameters.PrimaryScreenHeight);
}

當然,如果是習慣使用Win32的程式設計師
也一樣可以用GetSystemMetrics來取得

const int SM_CXSCREEN = 0;
const int SM_CYSCREEN = 1;

[DllImport("user32.dll")]
static extern int GetSystemMetrics(int nIndex);

Size GetScreenResolution()
{
return new Size(
GetSystemMetrics(SM_CXSCREEN),
GetSystemMetrics(SM_CYSCREEN));
}

此時要注意DPI的設定,在非預設的DPI(96)下
由於WPF的特性,這兩種方法取出的數值會不同
例如同樣在1920x1080的解析度下
DPI 設定SystemParametersGetSystemMetrics
100% (96)1920x10801920x1080
125% (120)1536x8641920x1080
150% (144)1280x7201920x1080

這樣彷彿使用GetSystemMetrics比較一致
但在WPF中,視窗相對位置會使用SystemParameters的解析度來算
也就是一個最大化的視窗,在滑鼠事件中取得右下角座標時
會取得SystemParameters的大小
所以還是需要依照使用的需求而選用
有關DPI的設定可以參考在WPF中取得DPI的設定DPI Virtualization

--
參考資料
SystemParameters 類別
GetSystemMetrics Function

2010年2月22日 星期一

在WPF中自訂Cursor

如果要使用WPF內建的游標符號(Cursor)可以直接透過

void SetCursor()
{
Cursor = Cursors.ArrowCD;
}

內建的游標符號種類可以參考Cursors 類別
但是有時候我們會希望要把游標設成一張圖或是一個UI元件的樣子
這時候就要透過Win32的幾個函式了

struct IconInfo
{
public bool fIcon;
public int xHotspot;
public int yHotspot;
public IntPtr hbmMask;
public IntPtr hbmColor;
}

[DllImport("user32.dll")]
static extern IntPtr CreateIconIndirect(
ref IconInfo piconinfo);

[DllImport("user32.dll")]
[return: MarshalAs(UnmanagedType.Bool)]
static extern bool GetIconInfo(
IntPtr hIcon,
ref IconInfo piconinfo);

然後將一張圖檔(System.Drawing.Bitmap)轉成WPF的Cursor

Cursor CreatCursor(Bitmap b, int x, int y)
{
/// get icon from input bitmap
IconInfo ico = new IconInfo();
GetIconInfo(b.GetHicon(), ref ico);

/// set the hotspot
ico.xHotspot = x;
ico.yHotspot = y;
ico.fIcon = false;

/// create a cursor from iconinfo
IntPtr cursor = CreateIconIndirect(ref ico);
return CursorInteropHelper.Create(
new SafeFileHandle(cursor, true));
}

這裡hotspot是指真正的游標在這張圖的哪個位置
如果是(0,0),整張圖會在游標的右下方
如果是圖的寬高的一半的話,那就會像是抓到整張圖的中心在動

另外,有時候會希望要把游標設成一個UIElement的樣子
那就先做一個轉換

Cursor CreatCursor(UIElement u, Point p)
{
Cursor c;

/// move to the orignal point of parent
u.Measure(new Size(double.PositiveInfinity,
double.PositiveInfinity));
u.Arrange(new Rect(0, 0,
u.DesiredSize.Width,
u.DesiredSize.Height));

/// render the source to a bitmap image
RenderTargetBitmap r =
new RenderTargetBitmap(
(int)u.DesiredSize.Width,
(int)u.DesiredSize.Height,
96, 96, PixelFormats.Pbgra32);
r.Render(u);

/// reset back to the orignal position
u.Measure(new Size(0, 0));

using (MemoryStream m = new MemoryStream())
{
/// use an encoder to transform to Bitmap
PngBitmapEncoder e = new PngBitmapEncoder();
e.Frames.Add(BitmapFrame.Create(r));
e.Save(m);
System.Drawing.Bitmap b =
new System.Drawing.Bitmap(m);

/// create cursor from Bitmap
c = CreatCursor(b,
(int)p.X, (int)p.Y);
}

return c;
}

有關measure及arrange可以參考在WPF中的畫面重排(Measure & Arrange)在WPF中存圖檔的問題(RenderTargetBitmap)

--
參考資料
FrameworkElement.Cursor 屬性
WPF Tutorial - How To Use Custom Cursors
ICONINFO Structure
CreateIconIndirect Function
GetIconInfo Function
SafeFileHandle 類別